Group Details Private

Global Moderators

Forum wide moderators

Member List

  • Creating a Windows 2022 Server VM on Proxmox 7

    Creating a VM is an easy enough task that can be left to defaults a lot of the time. But if you want the best performance/options under Proxmox, you will have to go through a few minor hoops as Windows Server 2022 (or prior) does not have the drivers needed for everything built in.

    • Click on Create VM to get the dialog box. First click on Advanced if it is not already checked.
      2b4fab9a-d79d-4e30-85ad-fecfd981b31e-61d2eb12-74d6-4b3b-8344-466a09e7d095-image.png

    • Give the VM a name (2), ID (1), Start on boot (3), and order/delay (4) as desired. Then hit Next.

      • Everything below the line is hidden if you have not checked Advanced.
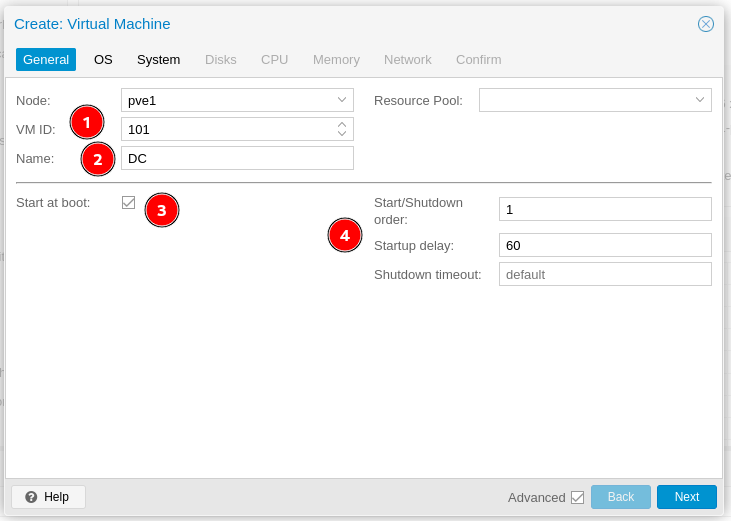
        1fae10a8-9fae-43a8-b1ca-570122289659-1a7faaf6-d754-4397-9ef7-59035119be17-image.png
    • Choose your ISO and Guest OS Type, then hit next.
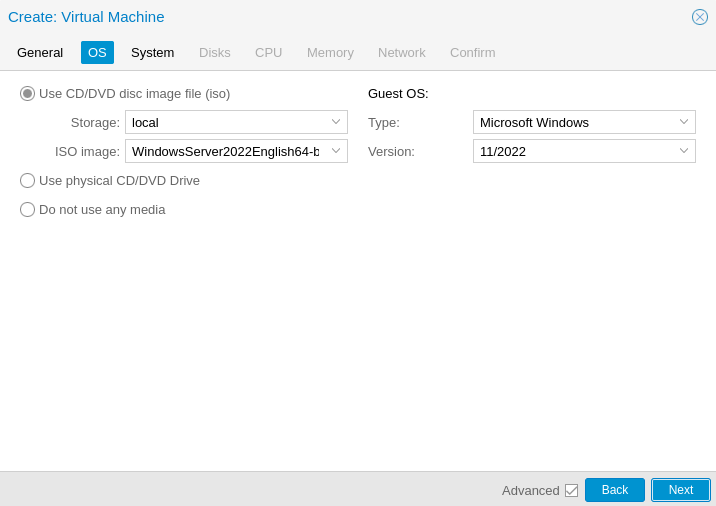
      0ac3f9e9-34da-434c-b2fc-09d233972ff7-3396d1a1-3d71-4fda-b832-b8992b04ee10-image.png

    • Since you specified a modern version of Windows, Proxmox automatically uses UEFI and you will need to specify EFI and TPM storage locations.

      • I always keep them on the same disk that will house the boot storage.
        ef3e4b4e-aa83-4b78-b1cc-1870b6aa0251-95401764-637a-492d-a37f-56b81dea16b8-image.png
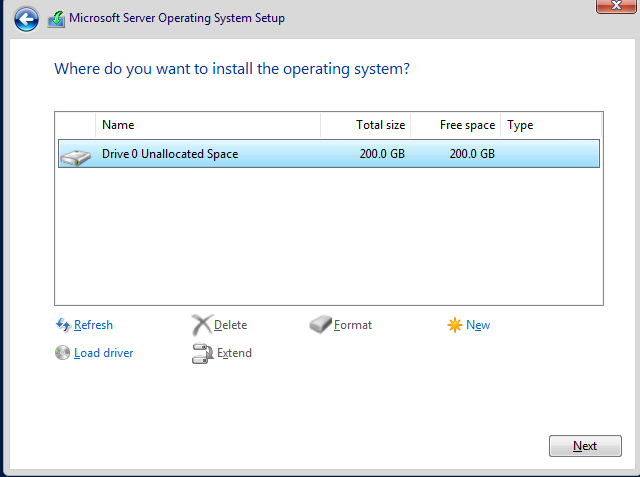
    • By default, it will use VirtIO for storage, you want this, but will have to add a driver during the Windows install itself. Also enable the Qemu Agent, again the guest agent will have to be installed after Windows setup completes.
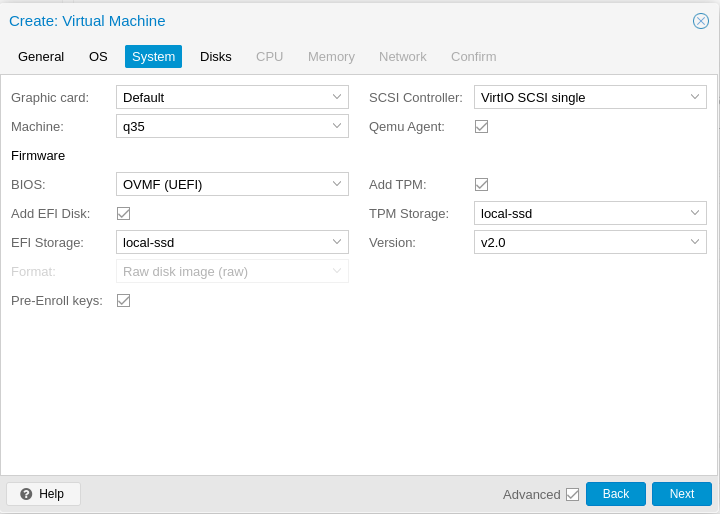
      9c9de462-d07b-4cad-9632-75c64fcfef74-159de397-558f-46af-b212-6e43b4da721b-image.png

    • Change the default IDE disk to SCSI (1), set the storage location (2), and your desired disk size (3).
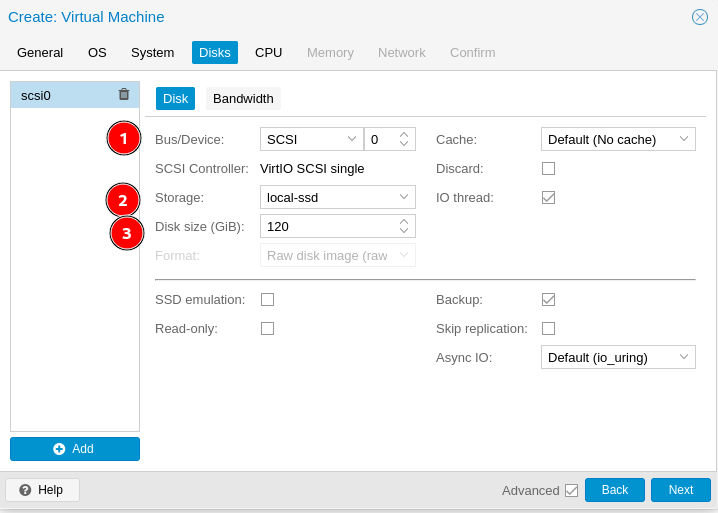
      daf37daf-1cc8-487b-b425-49c0d79238f4-d1726fd5-4a38-428d-b433-1981c6b5ab96-image.png

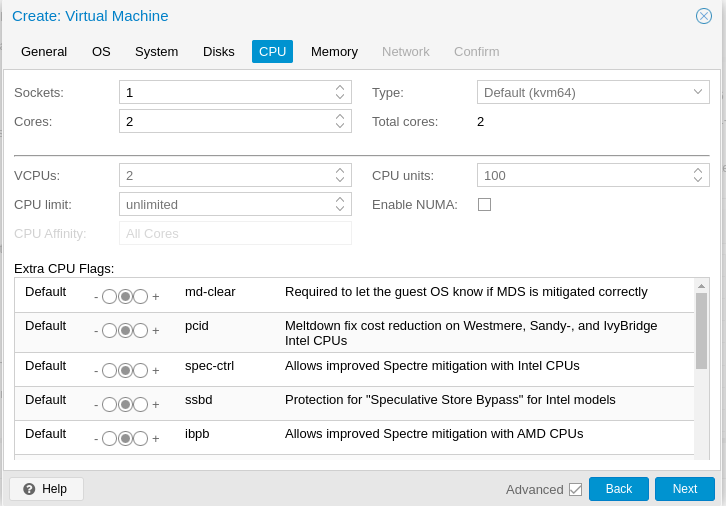
    • Assign the number of cores you need.
      c17e0574-c160-476e-858f-8ee8d1cec616-7e22d1f2-e3d1-4846-ad2c-2ec00885cd63-image.png

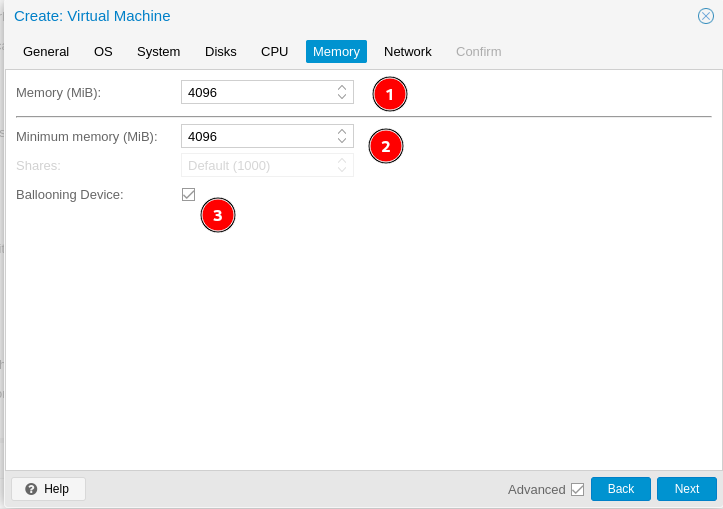
    • Set your max memory (1), minimum memory (2), and ensure Balooning device (3) remains checked.
      9c3525d1-1e6c-4635-86ac-49cc12bcf9ae-475c5d4f-8166-47dc-8771-1b28b5a57f80-image.png

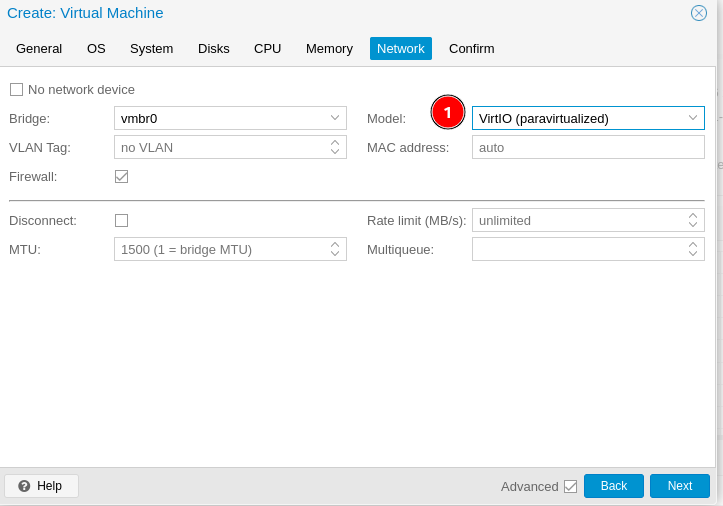
    • Change the network adapter model to VirtIO (1). You will not have a working network on boot up. The VirtIO drivers will need installed first.
      3facee43-75c3-495a-8177-5dc66aaa222d-4330d73d-9ebf-48cc-8658-fd1ab4eccdef-image.png

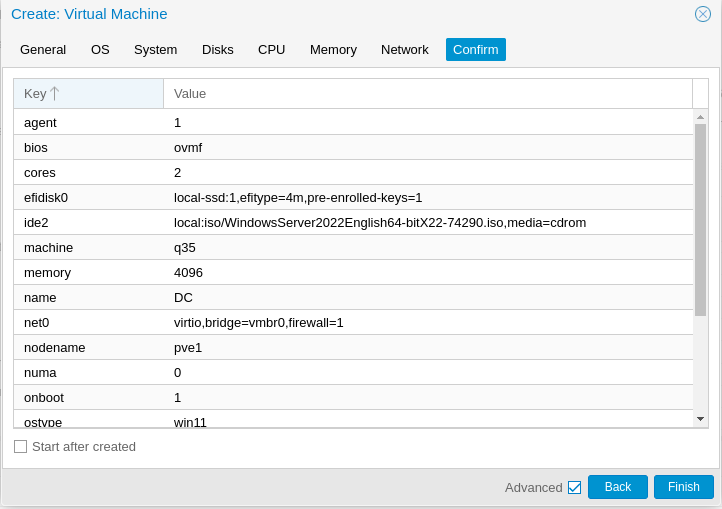
    • Review and hit finish. Do not check Start after created.
      aaffcfe1-d6cd-4832-be84-2abdfa7d38d9-cdf70445-8bf7-4b27-a39d-f1b551edf2ee-image.png

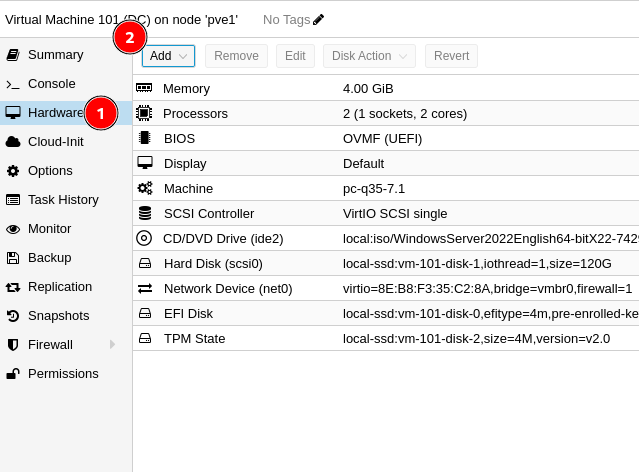
    • Select the VM and click on Hardware (1) and then Add (2)
      8c5d1081-740f-4041-a84e-f461712c3b1a-169a784d-1318-4ebb-8e2d-4dcdadf3316a-image.png

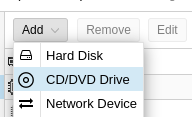
    • Choose CD/DVD
      2131b224-084d-499b-814d-9d87c71a3dd0-ef989b4e-35bf-4ae8-9936-394cfac8c475-image.png

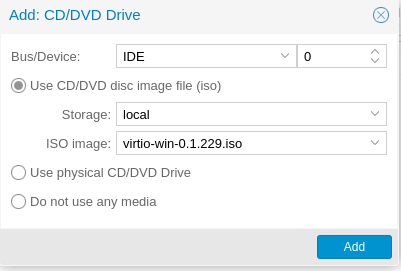
    • Add the virtio-win ISO, you will need this mounted to add the storage driver during install.

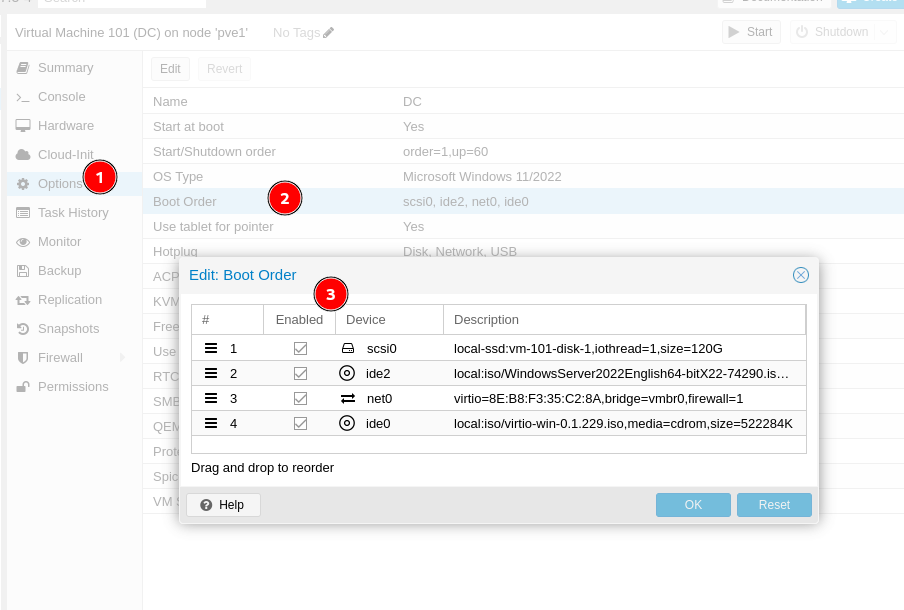
    • You can verify your boot order if you want, but it should still be correct.
      8f4b2090-2984-49af-a41d-dfbbfa2be7a1-77d58e8f-5a02-49b4-b7c2-dc04e0882c35-image.png

    • Open the Console
      268648c6-32ed-4323-976f-c288514811af-9d9975e4-acea-4a37-8142-9c3d020d6757-image.png

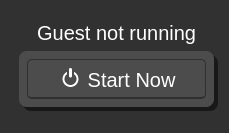
    • Click Start Now
      fe77ddfc-6d83-4f45-bed1-1e95ca7a225f-6d886208-c861-46f9-a991-448d7c5a183d-image.png

    • Click in the window and press a key, because Microsoft still thinks all of us are fucking stupid.
      969635e4-4f14-438f-b100-bc9f192bb7d5-c4722198-166d-4cb7-89c7-dca86b349115-image.png

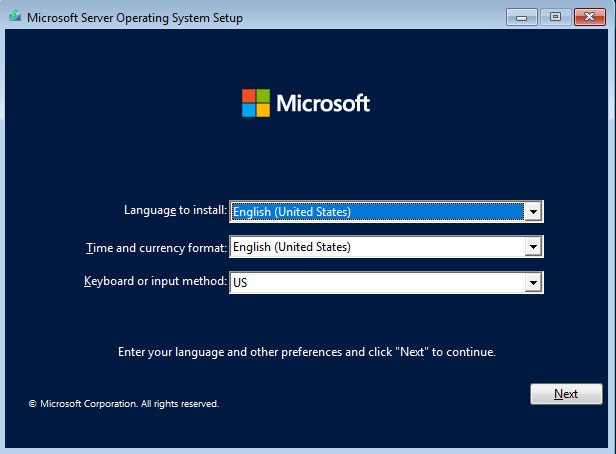
    • Set your options and hit Next.
      60f7a2da-a348-435e-a9ff-8c31ddf4b6bf-49457952-f3d3-45e7-9fc4-8fe7f6dc3905-image.png

    • Hit install now.
      9d7b6d9f-1af7-4232-989f-0ea434a0ce67-451c5043-2c41-428f-b03e-c3db03d21bf0-image.png

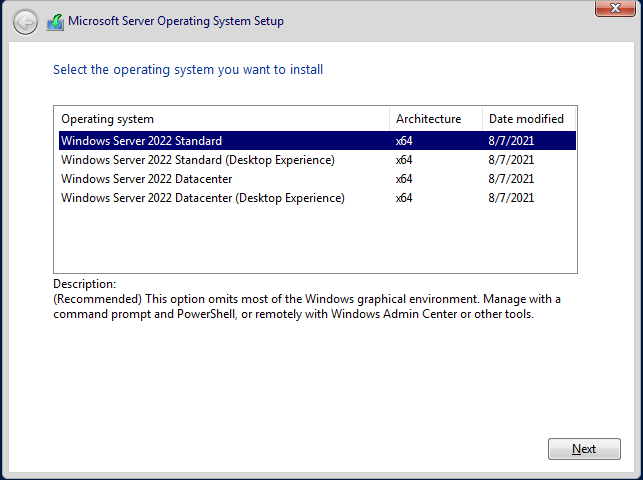
    • Choose your OS options and hit next.
      ee927e46-28a1-4bac-8b77-b9d19a837b8a-8dc9e587-bdaf-43ca-becb-4d5f4cae3b2c-image.png

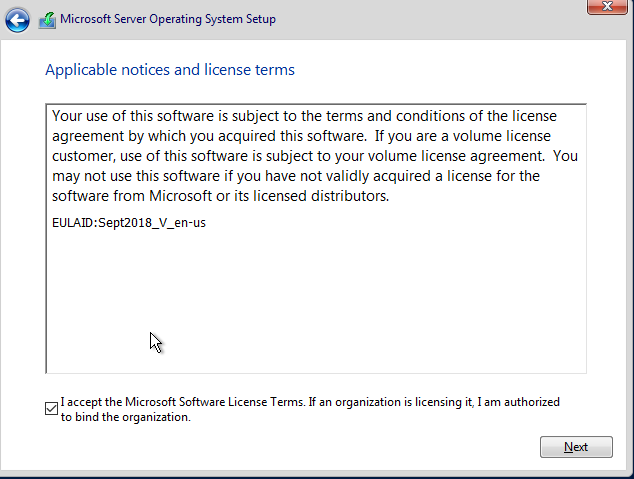
    • Accept the license and hit next.
      4d539c3f-06a7-4bc5-9341-a82c62c37082-c2ce2d63-a256-4575-8ec6-f001524e538b-image.png

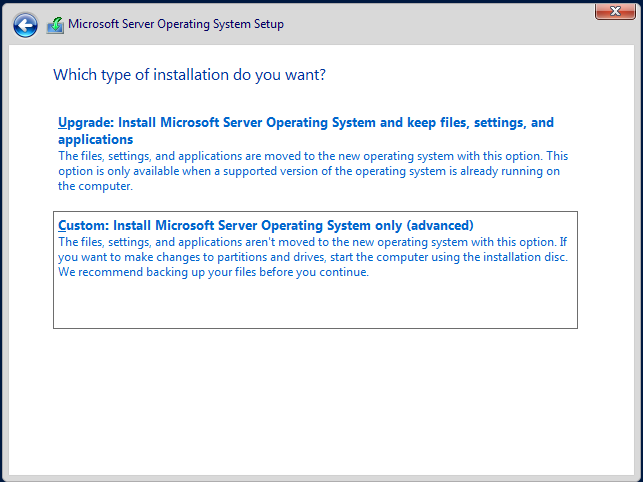
    • Choose Custom since Microsoft thinks a new install is an advanced task.
      b6967c86-f1e9-45f8-b264-e6a4785be3c2-e7a211e8-d4d3-4d84-9477-b6722b8c5625-image.png

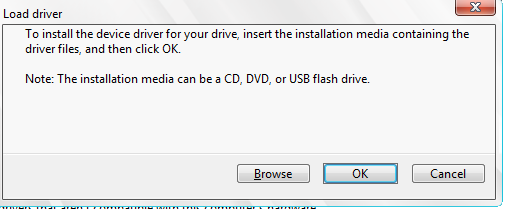
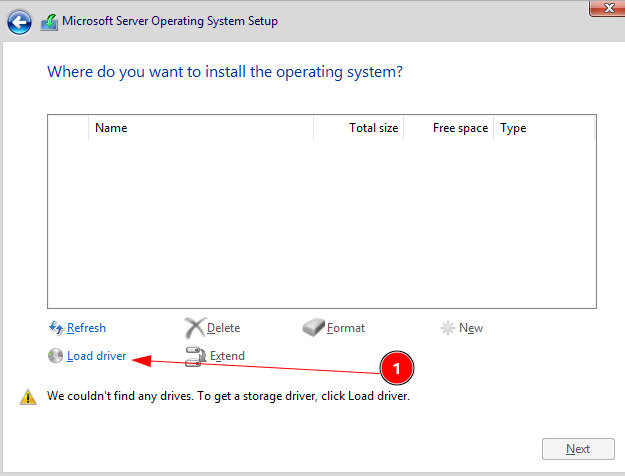
    • Finally, you can load the VirtIO driver (1)
      cad4c333-f4e6-4f39-8c32-e293c1babee9-94434902-ddbc-4d31-9a2c-a6f98b61e863-image.png

    • Click Browse.
      a120dffa-7ff6-4eeb-b34f-ba7568811f04-ee6eb413-c957-4230-a2c4-c4f48603add1-image.png

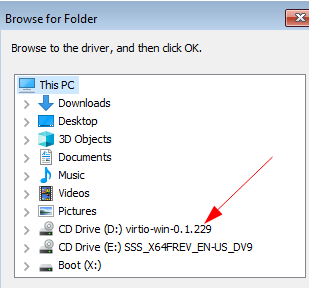
    • Expand the virtio CD Drive
      98afb691-dccc-4ee5-829e-e7c5c80450bd-0e809cea-fbe4-4b53-8eef-88c38b96a0db-image.png

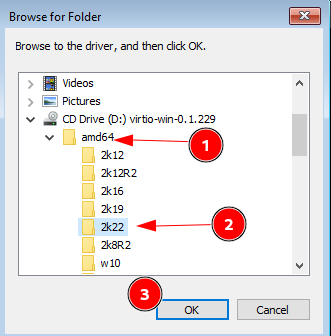
    • Expand amd64 folder (1), click on 2k22 (2), and click OK (3)
      2392520c-411c-4ce6-ba0b-50a5375730b9-b1d5f1fc-6d96-4a90-a0a7-6168bfc14f93-image.png

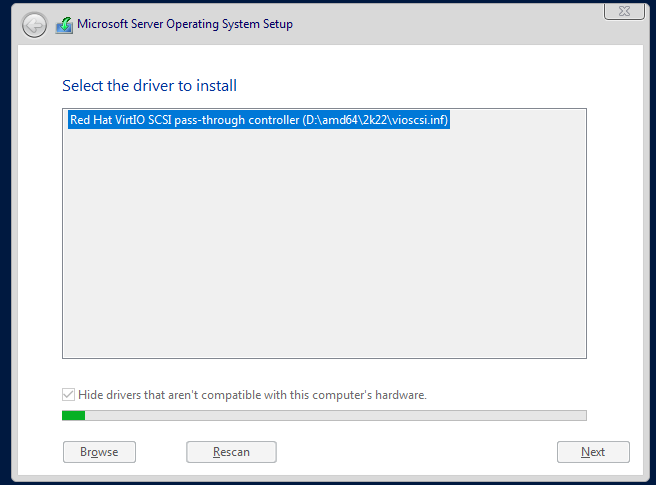
    • Click on Next and it will rescan for the disk, no need to click on rescan yourself.
      b2266acc-f661-40f1-9455-96e6d2383a08-3c18de1e-af85-46bd-b7d9-f148eb74fb4f-image.png

    • Now the disk is available, click next
      fe68e89d-ccb5-4c44-af1f-4156e9423c23-a1500400-36c4-4465-8a70-e8cbbc5c8c54-image.png

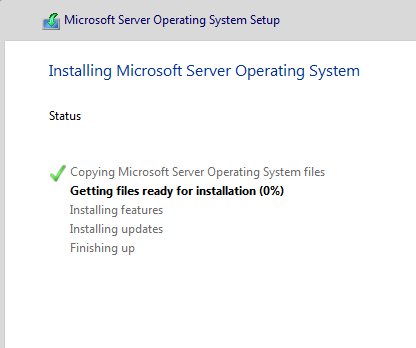
    • Windows will finish the install like normal and reboot.
      b3274703-4e12-4473-9f85-5b0a408c4eab-49104acc-6047-49e0-87ef-1f9562627b78-image.png

    • wait for it..... It will reboot again
      1b5e2b9e-f209-4572-8d46-5b0dae1f14aa-17732bae-41b3-48ba-8ba6-cbbc2aeabaf4-image.png

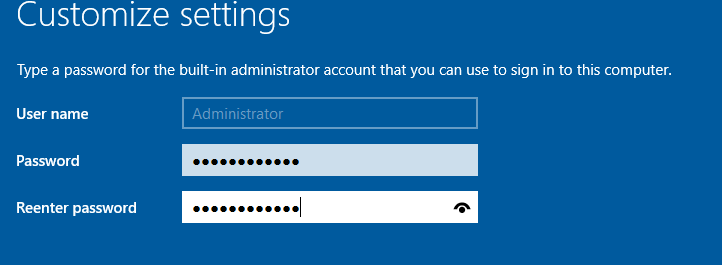
    • Create a password for the account you will delete anyway and click Finish. Because you don't leave Administrator do you?
      dca1ae33-a99b-4909-bb2c-0c7a1010cdc0-384f6f58-ccaf-4600-b701-a89115b4d2b4-image.png

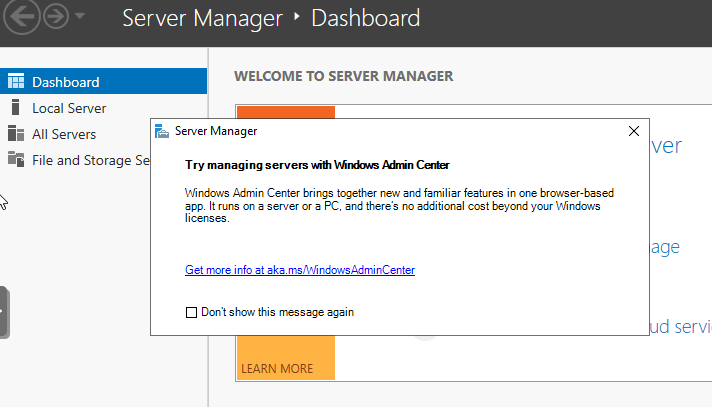
    • This example uses the Desktop Experience, so login and wait for the desktop. Close Server Manager and the WAC pop up.
      e2f94ae1-5713-4d82-ab1e-c7ca7e271b6b-5ed7dfca-aa08-4018-87cb-80d9bc5a55a0-image.png

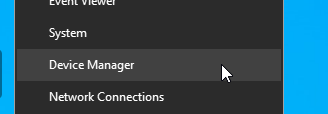
    • Open Device Manager
      d699c9d2-ed65-4fac-a974-2753d85f134b-efe871fd-2df0-417f-a661-085d160df53b-image.png

    • You will see three things to fix.
      48f73fdc-1411-4763-ad5e-4c4cb1a7a17f-3236b489-8a10-4b5e-b05d-c93785bcbbed-image.png

    • Right click and choose update driver for the Ethernet Controller.
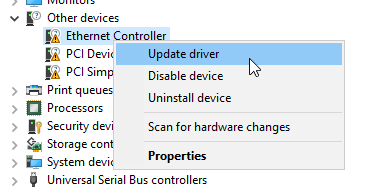
      9b4612ad-805a-42f4-a19a-ff5b4f38a242-4e7d4fe8-4740-4e59-b241-12758e2933bf-image.png

    • Choose Browse
      22090904-ad38-4eb2-9aad-edb40ccd37b1-7f195d68-769e-44bd-a3ae-7d1eebb16e69-image.png

    • Browse again
      a9920627-df2e-4100-af3c-f8e3fad7cbb0-9e136a99-cf52-4279-9e95-175c5e73c737-image.png

    • Expand the virtio ISO disk (1), expand netkvm (2), and select 2k22 (2), then click OK.
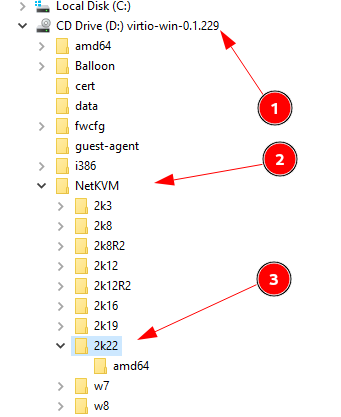
      f67651e3-baf9-4887-bc8b-461a8936357a-006522af-cfe4-4424-ab4a-a57405a10c09-image.png

    *Hit next and it will install the driver.
    7f32efda-7e62-4bd7-92ba-5e6d3f14df2e-image.png

    • Before you hit close, you will want to hit yes on the Network discoverability screen for most use cases.
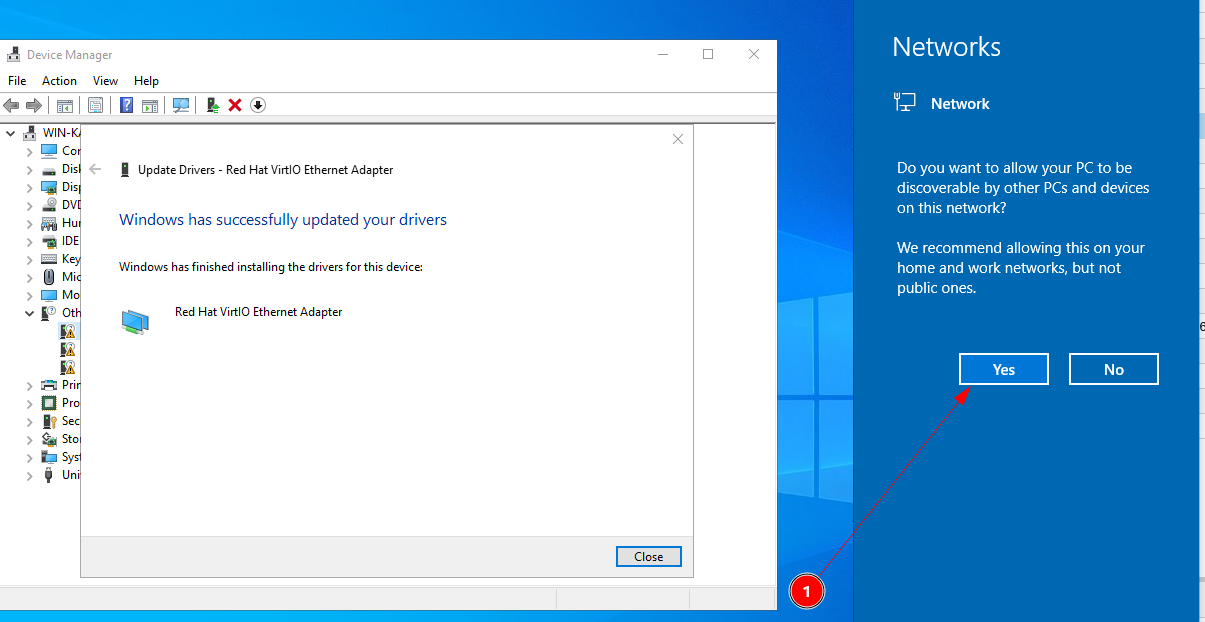
      6bc791ed-d3ce-4f97-8913-bc5d21bb7aaf-a3cd2b0c-b0c3-4e7b-a4c8-d55c23ada201-image.png

    • Repeat the process for the remaining two items.

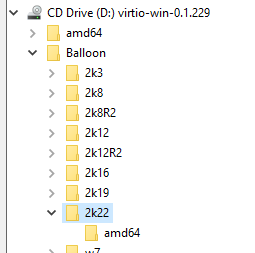
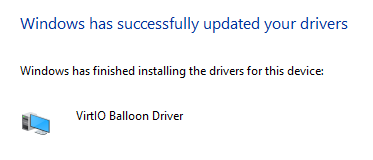
      • PCI Device is the Baloon folder
        3006c735-9b96-4541-924d-dd9e50057236-4f95e4c6-c471-4b86-a624-7c8681a52e52-image.png
        0c083448-9e66-4ab4-8f2a-b11260832f43-0f18c101-68cc-4a1a-bb27-6392c5b7c48e-image.png
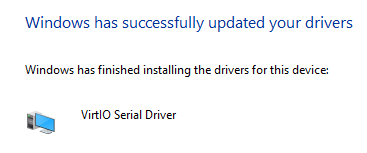
      • PCI Simple Communications Controller is the vioserial folder
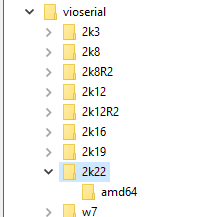
        f85edca9-067b-4d71-85d2-a46c5e6bf08a-93468da4-2dd2-4193-9916-527ed78fd4b2-image.png
        20b68e00-581c-4b2f-b641-35e87b035371-70bc7965-c8b6-45a7-b95c-23d6a9ff9da4-image.png
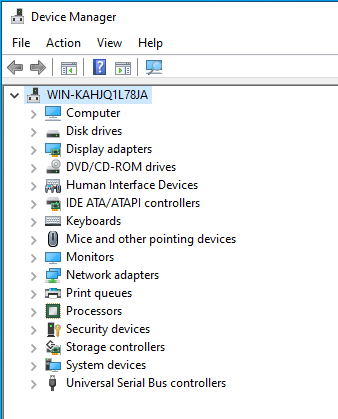
    • Now you have all the drivers for the system devices.
      cbac0112-c093-4ad4-8e49-3bbd92e13ae2-9866c039-f13f-4341-a6ae-971426179dda-image.png

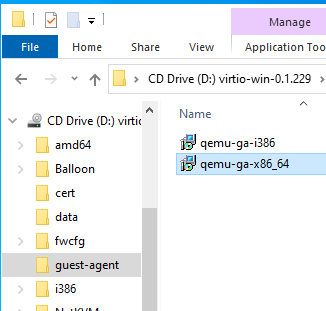
    • Finally, browse to the CD drive in Windows Explorer and install the guest agent
      c51704a7-187e-46ca-9cf5-b83daa0b52a2-9bebf0e4-4e0a-4df1-ae50-e4e8cde65c10-image.png

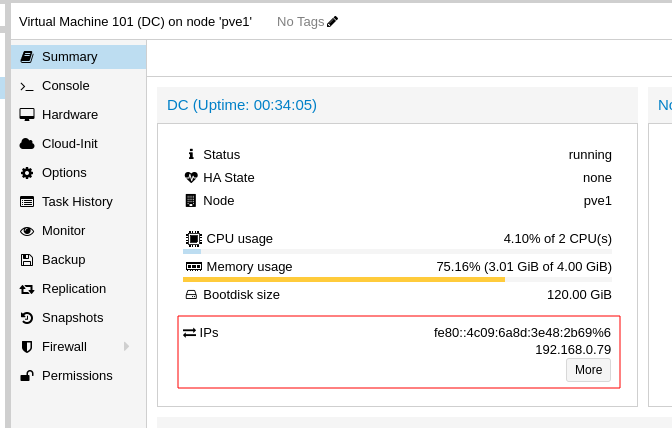
    • You will know the guest agent is properly installed is you see the IP addresses on the Proxmox Summary screen.
      851a10e3-06fc-4c05-bfd4-211d4d19f5a7-3cf3f46c-57da-4c0c-b067-272881b4bad0-image.png

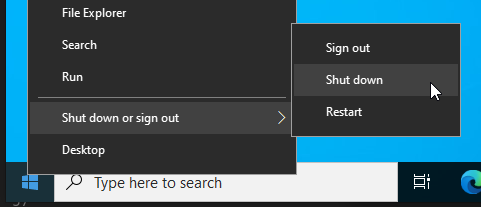
    • Shut down the VM
      8b382ad5-44c6-4c39-b6c6-9c243e31be12-2ab25930-1d3b-4167-8a7e-e6493eb2605e-image.png

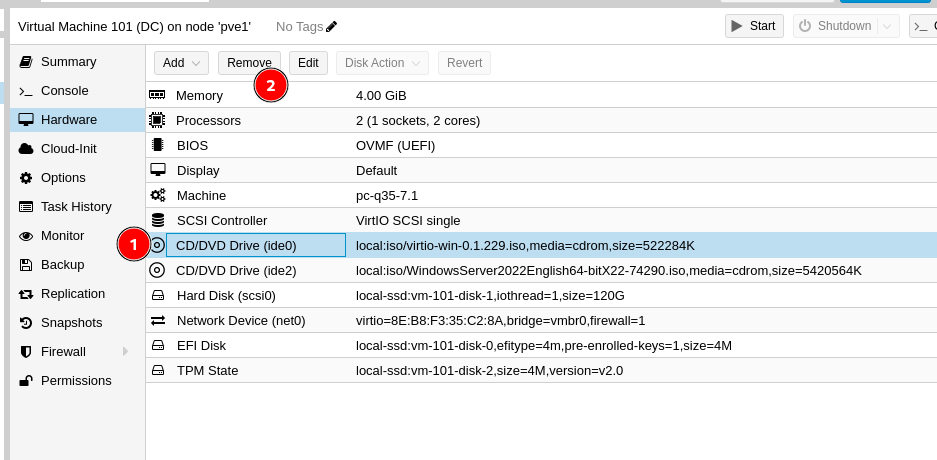
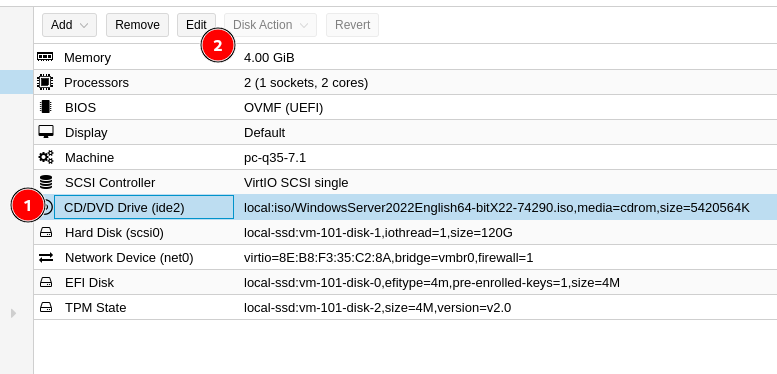
    • Remove the extra CD drive
      ad38fa2c-27a1-4086-a47a-63cb639a022b-0f45e200-045f-4ec6-adeb-d171fe7fd768-image.png

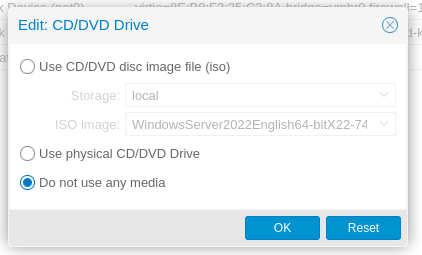
    • Unmount the Windows ISO.
      3381d050-c712-44f4-8585-9e9ce1b2afef-c9358d3d-59bc-417f-897f-853e62eaad39-image.png
      1801350d-8dca-4fac-a856-2a02ecee61fd-11ecb18b-63f7-4b40-929d-fb8fc80c6e2a-image.png

    • Start the VM back up and setup the server for the task you installed it for
    posted in Guides & Walkthroughs
  • How to Upgrade from FreePBX 15 to FreePBX 16

    Always do this upgrade via the command line over SSH. This prevents HTTP/PHP timeouts from affecting you. You can use the console if you want, but SSH is normal.

    1. Login with your non-root user. Because you never allow root to log in over ssh right?
    2. Update the system
    sudo yum upgrade -y
    
    1. Upgrade the current modules.
    sudo fwconsole ma upgradeall
    
    1. Fix permissions, as module upgrades can leave some files owned by root.
    sudo fwconsole chown
    
    1. Reload the system to rewrite the config files.
    sudo fwconsole reload
    
    1. Reboot, to make sure everything in in a pristine state, or at least should be.
    sudo reboot
    
    1. Log back in and then switch to root. If you run the versionupgrade with sudo instead of as root, it fails to properly do everything, even though it says the upgrade succeeds.
    sudo su -
    
    1. Download the versionupgrade module
    fwconsole ma downloadinstall versionupgrade
    
    1. Fix permissions again as it messes up file permissions in /var/www/html after you install it.
    fwconsole chown
    
    1. Reload
    fwconsole reload
    
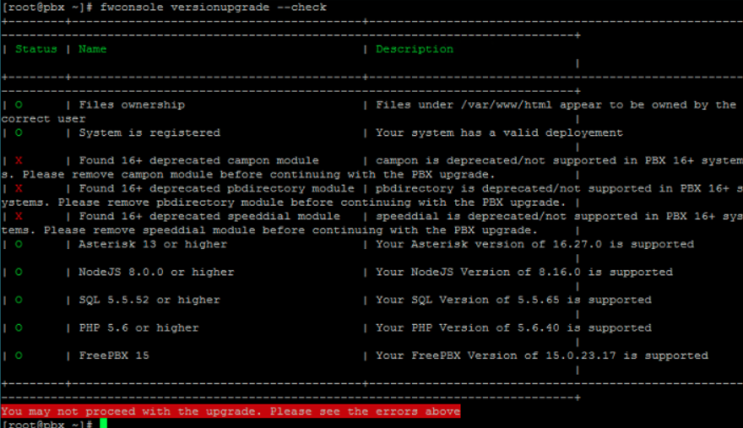
    1. Run the version upgrade check
    fwconsole versionupgrade --check
    
    • If you have an error about a deprecated module remove them and them reload.
      756b5fb2-09a8-4cf8-aa4e-e67862552e6e-image.png
    fwconsole ma delete campon
    fwconsle reload
    
    • Then run the version check again.
    1. It should be clean, so upgrade.
    fwconsole versionupgrade --upgrade
    
    1. Log back into the web interface
    • Make sure everything looks normal
    • Make a couple test calls, in, out, internal, etc.
    1. Once everything looks good, hop back to your SSH session and reboot. Sure everything is runing now, but how do you know it will reboot correctly if you don't try it now?
    reboot
    
    1. Assuming everything come sup normally, you are done.
    • The most common thing I find here is that I sometimes need to run fwconsole restart before the GUI shows a connection to Asterisk, even though everything is running.
    posted in FreePBX Guides
  • Create the Skyetel Outbound Trunk for International

    To enable your system to make international calls, you will need a third trunk. This time duplicate the outbound trunk.

    1. Click the edit icon 📝 to the right of the Skyetel_Outbound_NA trunk.
      3d35a123-bf56-44cd-a945-1600ca82132a-image.png

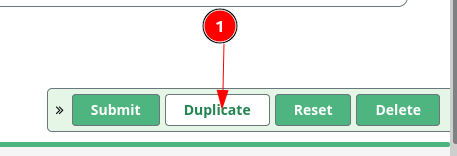
    2. Click the Duplicate at the bottom of the screen.
      21342aa1-1e1a-4ce2-863c-ed3c76c9ed3f-image.png

    3. Now you can click on the edit icon 📝 of the duplicated trunk, currently named Skyetel_Outbound_NA_copy_3.
      59f4a52d-fd6e-40f5-930c-c00c56fc49e9-image.png

    4. On the General tab, change the Trunk Name to Skyetel_Outbound_International.
      2445f9b2-03a5-47af-a036-ce40d632842d-image.png

    5. Switch to the PJSIP Settings -> General sub tab and change the SIP Server to hc.skyetel.com
      f0b6d693-56cb-4403-9e01-67a137f4b2e1-image.png

    6. Click on the Submit button.
      8751a416-898f-4399-92cf-6465fc95c8f6-image.png

    7. Click on the Apply Config button.
      66257690-73e8-404b-9df6-030725f75003-image.png

    8. You will see your trunk listed in the list and show as Enabled.
      e6b2ca4d-09bc-480d-a0b7-b93a90859682-image.png

    posted in FreePBX Guides
  • Create the Skyetel Outbound Trunk for North America

    After setting up the inbound trunk, you might want to just be done with all of this, but all of the hard work is done. For the outbound trunk we can duplicate and edit, saving much time.

    1. Click the edit icon 📝 to the right of the trunk.
      d0946709-fb2b-4f9d-9660-f8a49f99158f-image.png

    2. Click the Duplicate at the bottom of the screen.
      21342aa1-1e1a-4ce2-863c-ed3c76c9ed3f-image.png

    3. Now you can click on the edit icon 📝 of the duplicated trunk, currently named Skyetel_Inbound_copy_2.
      16cec354-f691-402c-b598-9ce8ffee41fa-image.png

    4. On the General tab, change the Trunk Name to Skyetel_Outbound_NA.

      • NA stands for North America. You will duplicate this trunk after it is done and that trunk up for International and High cost NA calls.
        824afcfc-14b8-4ee2-880d-da028900a397-image.png
    5. Change Continue if Busy to Yes.
      08ae8208-7744-4885-a500-db9b2de6e489-image.png

    6. Switch to the PJSIP Settings -> General sub tab and change the SIP Server to out.skyetel.com
      831e2381-82c8-4e74-8f2a-b3913e4d3758-image.png

    7. Switch to the Advanced sub tab and remove the list of IP addresses and CIDR blocks from Match (Permit).
      723e6049-8914-419d-acc6-520a2339350f-image.png

    8. Click on the Submit button.
      8751a416-898f-4399-92cf-6465fc95c8f6-image.png

    9. Click on the Apply Config button.
      66257690-73e8-404b-9df6-030725f75003-image.png

    10. You will see your trunk listed in the list and show as Enabled.
      745252c4-4132-45eb-a307-de87182e7a35-image.png

    posted in FreePBX Guides
  • Create the Skyetel Inbound Trunk

    Now that you have Skyetel setup to deliver calls to your PBX, it is time to setup FreePBX to accept those calls. This is done by creating a Trunk.

    1. Sign in to your FreePBX instance

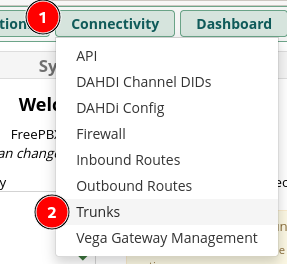
    2. Click on Connectivity and then Trunks
      10f55a33-c15c-4d7d-9748-86b075c0c3da-image.png

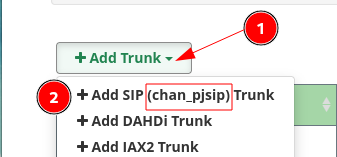
    3. Click on the Add Trunk button to show a list of options and then click on Add SIP (chan_pjsip) Trunk

      • Be certain it says chan_pjsip or you will not have a working system.
      • Depending on your FreePBX configuration, you may still see the legacy chan_sip option. This will not work.
        f373e36b-9b18-4bcf-9b80-05fd415c1960-image.png
    4. You will get the Add Trunk screen with 3 tabs, we will start on the General tab.
      cb822399-4197-486a-b2ec-e006aeec22b1-image.png

    5. Trunk Name is a descriptive name for the trunk.

      • Name this one Skyetel_Inbound
      • It cannot have spaces, and FreePBX will auto populate an underscore (_) if you press space.
        0efb721f-a204-41f3-91ab-cfcd9ff0443f-image.png
    6. Hide CallerID should be set to No by default. Leave it that way.
      fb2d8c0e-c536-4c8e-939b-8238999ae1b0-image.png

    7. Outbound CallerID should always be populated on all trunks as whatever your main number is with Skyetel.

      • This value is the default to use if a call goes out this trunk without any other Caller ID defined.
      • We will use the E.164 format for the number
      • + then Country Code then Number
      • The name section should be limited to 15 characters, the maximum for legacy POTS Caller ID.
      • Also, do not expect the name portion to be seen by most recipients. Skyetel will pass along whatever name is entered here, but it is up the the other side to accept it.
        63e8eaab-64b1-4831-a5f9-838c442a7865-image.png
    8. CID Options should be left on the default of Allow Any CID. You can read the help text to learn more about how this works.
      455c199f-5d49-4093-ab02-0d80e5d3d681-image.png

    9. Maximum Channels should be set to at least one higher than you set in the Fraud Alert for the Endpoint in Skyetel.

      • Only outbound calls are counted towards this maximum.
        74f4c39f-2640-448f-8078-de266fe761d6-image.png
    10. Asterisk Trunk Dial Options should never be changed from System
      a2ba6c58-80dd-4b5a-89e6-bcdff9e48ede-image.png

    11. Continue if Busy can be left at No for the Skyetel_Inbound trunk as this only applies if the trunk is used in an Outbound Route
      58ec61bb-6710-4644-9426-ec654ad7e2c9-image.png

    12. Disable Trunk must be set to No or the system will not use the trunk.
      03c6a945-37f6-4eb0-9b3c-41f939d428d6-image.png

    13. Monitor Trunk Failures is an advanced setting and does not mean what most people think. Leave it set to No.
      04e11880-483e-4c7e-90ff-45ce0e562995-image.png

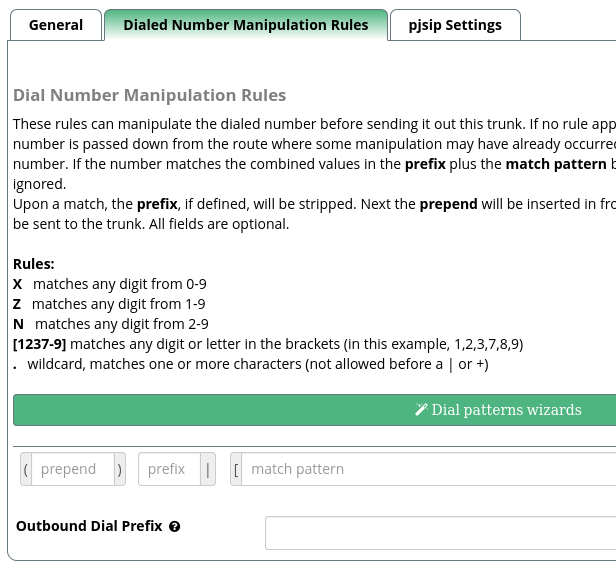
    14. Moving on to the Dialed Number Manipulation Rules tab, is easy as you will leave this all blank.

      • You do not do anything on this tab for a trunk, unless there are special circumstances.
      • More detail on this will be discussed in the Outbound Route setup.
        e1fb6454-d084-4323-956a-1ee45a068667-image.png

    15 On to the pjsip Settings tab, which has three sub tabs.
    4d25772c-c0bb-4f14-a765-c6294b160ccb-image.png

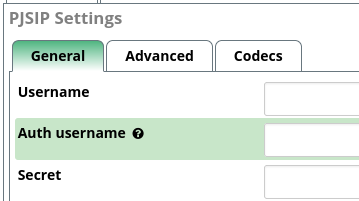
    1. The General sub tab is where you tell the trunk what it is connecting to. You will leave Username, Auth username, and Secret empty.
      c69dddd8-13cc-4050-bb07-f0fbf285782c-image.png

    2. Authentication will be changed to None, which cause the priors three fields to become disabled.
      90b013b7-53c0-4ee7-b5da-c0bff3d26e49-image.png

    3. Registration is also set to None. This also gets changed automatically when Authentication was changed.
      e94fb51c-9470-4305-9ed6-33e20f35d11e-image.png

    4. Language Code should be left on Default.

      • Trunk specific languages is an advanced task.
        9e9757f2-cd60-4266-b319-e71409f0e7ea-image.png
    5. Sip Server will be set to in.skyetel.com

      • Prior to October 8, 2021 this was na.skyetel.com
        c38fcf2d-ff12-4b88-8be7-60b9e12888a6-image.png
    6. SIP Server Port is 5060.

      • This is Skyetel's listening SIP port, not yours.
        3cccb9fe-599c-478b-b191-a4b1072bfbf0-image.png
    7. Context should be changed to from-pstn-e164-us, which matches the fact that our phone number in Skyetel will be sent in the E.164 standard.
      46b852b8-a50d-4aa0-84fc-4eb91682afb2-image.png

    8. Transport defaults to 0.0.0.0-udp and should be left that way.
      35624972-e273-4f00-a1de-6738f4f1c0a2-image.png

    9. Moving to the Advanced sub tab, most settings will be left at their default values.
      c7d57c92-ef21-43f5-824d-9e05b25266b0-image.png

    10. Match (Permit) is the first that needs changed.

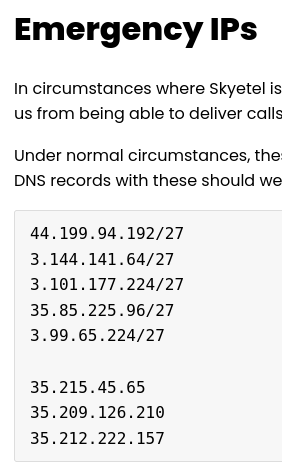
      • On this Skyetel_Inbound route, we need to enter the full list of IP addresses or CIDR blocks that Skyetel could ever send a call from. Skyetel maintains that list on the Skyetel IP Addresses article.
      • You need to add the 4 Standard IP addresses that in.skyetel.com resolves to, as well as the list of Emergency IPs
        72a8c15e-861b-4865-ac82-30021fb7db0d-image.png
      • This must be added as a single comma separated line, here is a copy/paste version for you.
    52.41.52.34/32,52.60.138.31/32,50.17.48.216/32,52.8.201.128/32,44.199.94.192/27,3.144.141.64/27,3.101.177.224/27,35.85.225.96/27,3.99.65.224/27,35.215.45.65,35.209.126.210,35.212.222.157
    

    7d9c6bdb-9acb-4124-9372-49cd74612e40-image.png

    1. Trust RPID/PAI should be changed to Yes
      3c673e9c-3740-4893-b22a-ea4eab0cccaf-image.png

    2. Send RDPI/PAI should be changed to Both
      9b80b97e-fea3-4035-90fa-7fe419485555-image.png

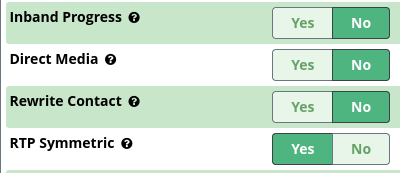
    3. Inband Progress, Direct Media, Rewrite Contact, and RTP Symmetric should be the correct value by default, but verify that they are No, No, No, and Yes respectively.
      897267e7-311c-4678-ba9d-11f95547831b-image.png

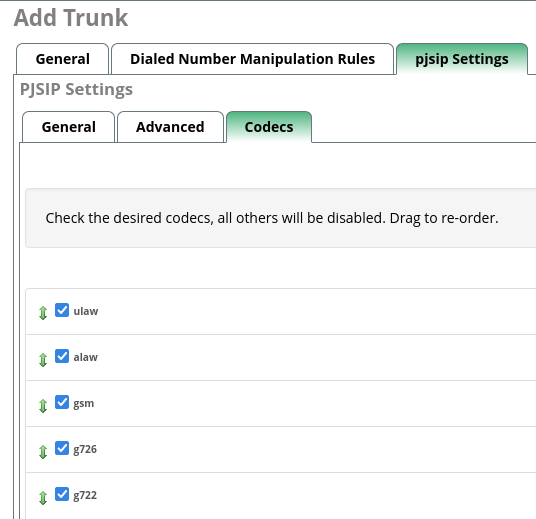
    4. Final tab! Go to the Codecs tab and ensure that ulaw is in the list. By default it should be first.

      • Updating codecs is an advanced task not covered here.
        ade3b3d6-2b06-4488-8f4f-019b997b8893-image.png
    5. Click on the Submit button.
      8751a416-898f-4399-92cf-6465fc95c8f6-image.png

    6. Click on the Apply Config button.
      66257690-73e8-404b-9df6-030725f75003-image.png

    7. You will see your trunk listed in the list and show as Enabled. Inbound calls will now hit your PBX.
      39deff26-6997-4186-9b86-15e3e2d2ee4c-image.png

    posted in FreePBX Guides
  • Set the phone numbers in your Skyetel portal to route to your PBX

    Now that you have an Endpoint Group and Endpoint setup, you can setup your phone number(s) to point to so calls will be delivered to your PBX.

    Setup a number to route to your PBX

    1. Expand Phone Numbers
    2. Click on either Local Numbers or Toll Free Numbers depending on what type of number you bought or ported in.
      • You will see a list of the phone numbers of that type that you own through Skyetel.
    3. Click on the gear ⚙ to the far right to edit the number
      3668bace-6d93-4eda-8d7a-e66ad502e41d-image.png

    Number Editing

    • There are up to 5 tabs of information you need to edit for each number, depending on what feature you need or want for a number. This guide will only be covering the General tab.
      3d75b57a-1ee8-4364-bb4e-db023b7782c6-image.png

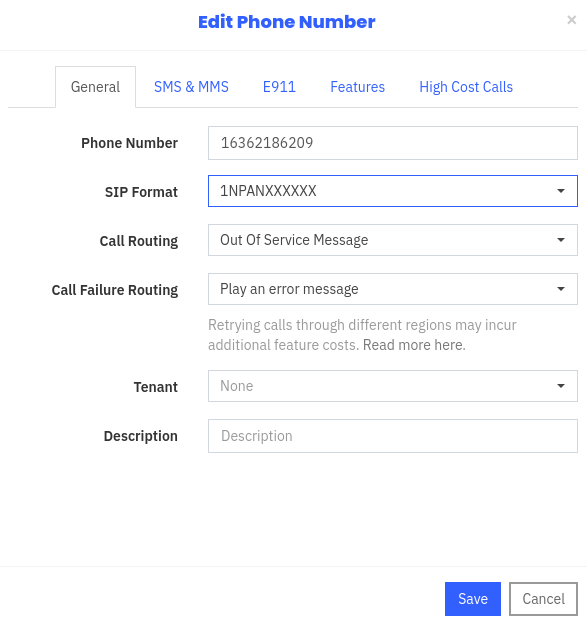
    The General tab is where you choose how a number routes and what you want it to do in a failure to route to that selection.

    9d620cb0-8589-4c48-9881-523398e9b21e-image.png

    1. Phone Number is obvious, and not editable. This is the phone number you are editing.
      877d27f4-81e5-452d-9d75-c70710fbf89b-image.png

    2. SIP Format is the way that Skyetel will deliver calls to this number, to your PBX.

      • By default Skyetel uses an 11 digit number format familiar to people in North America. This is called the NANPA or NANP format. I always recommend to change this to the E.164 format as it is an international standard, either format can work for FreePBX.
      • This guide and others related to FreePBX will assume the E.164 format.
        cc641cdb-1ba4-4180-add7-a99e8b4441cb-image.png
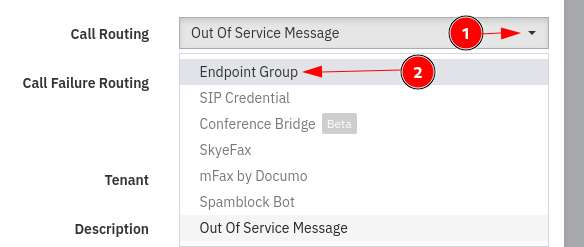
    3. Call Routing is where you choose your normal destination for calls. In most cases, you will be using Endpoint Group.

      • There are use cases for the other options, but those are not covered in this guide.
        f553ec12-50b7-403a-9bd8-ec529cb31024-image.png
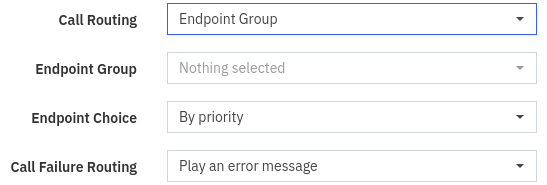
    4. Once you select Endpoint Group in Call Routing you get two new options inserted before Call Failure Routing.
      c062dcf8-3653-414a-97a0-b160dc3eb842-image.png

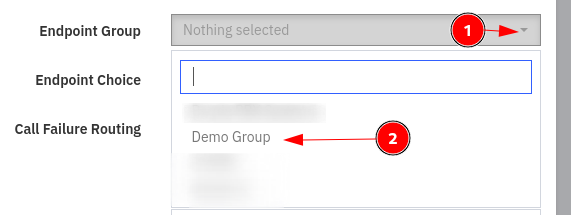
    5. Endpoint Group is here you select the Endpoint Group you previously created.

      • I have other Groups (obfuscated), you should only have the one at this point, Select it.
        276f8712-98d9-4bb5-b8ee-4e7b4a7daf6b-image.png
    6. Endpoint Choice will not be used by most users as they only have one Endpoint in their Endpoint Group.

      • But if you have more than one, you can chose how this number chooses one. The default is By priority, and the priority is set in the Endpoint Group.
        1e77d405-f9c3-40b6-9557-d5928ba71c5b-image.png
    7. Call Failure Routing is what you want to happen to the call is Skyetel cannot reach your PBX. Leave it at the default until you go read the guide on this feature.
      e5b1229b-d8f6-4f64-9db0-453807443f3f-image.png

    8. Tenant is an advanced need. If you have these set up, then you would select it here.
      a7bfa738-aabf-4499-a03b-a68632e344ee-image.png

    9. Description is useful when you have a lot of phone numbers. It lets you know at a glance what the purpose of that number is. If you only have one or two numbers, it is less important.
      0aeff845-f190-412a-8a3c-a2032a08a66a-image.png

    10. Click Save and the number will begin routing to your PBX. Typically within seconds, but it can take up to a minute to fully propagate.

    posted in FreePBX Guides
  • How to setup your system to use Skyetel as your SIP trunk provider

    Bundy & Associates uses Skyetel as their go to SIP trunk provider because of the high quality of service and the low cost.

    Setting up a FreePBX or PBXact system to use Skyetel is a very easy process, but does have a few steps that can confuse the inexperienced.

    1. Create an Endpoint Group in Skyetel to point to your PBX.
    2. Set the phone number(s) in your Skyetel portal to route to your PBX.
    3. Create the Skyetel Inbound Trunk
    4. Create the Skyetel Outbound Trunk for North America
    5. Create the Skyetel Outbound Trunk for International
    posted in FreePBX Guides
  • Create an Endpoint Group in Skyetel to point to your PBX

    Create the Endpoint Group

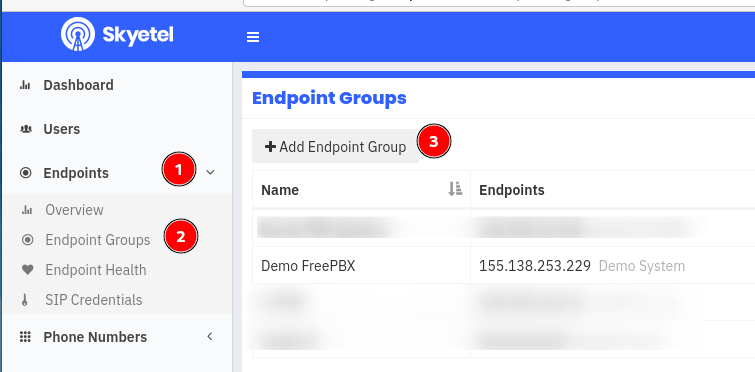
    1. Log in and expand Endpoints.
    2. Click on Endpoint Groups.
    3. Click on Add Endpoint Group.
      562bde41-740f-483e-b870-bc8e8e6bf94c-image.png

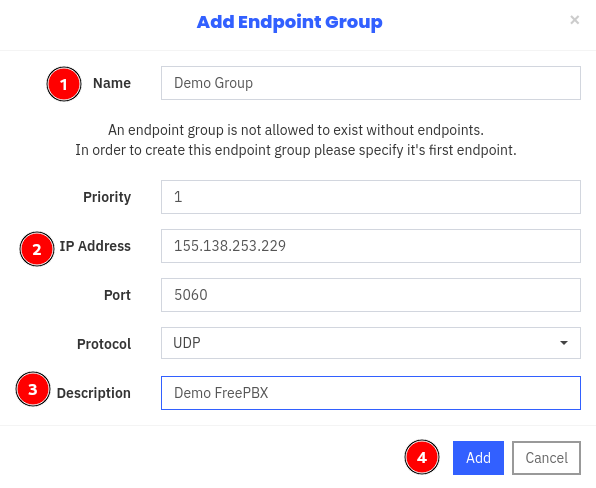
    Enter your PBX information, this creates an Endpoint Group and the first Endpoint inside the group.

    1. Name is the name you will see for the endpoint group.
    2. IP Address is the public IP address of your PBX.
    3. Description is the description of the actual endpoint.
    4. Click Add to finish.
      8fb100da-304d-430a-a89d-86b012a1cf6b-image.png

    Now you want to click on Endpoint Health to see your new group and set some alerts for it.

    • Note, it will show your system down. This is because you have not yet set anything up in FreePBX to listen for it. One step at a time.
      7fb9f9a8-3658-4041-8e2d-135b51108457-image.png

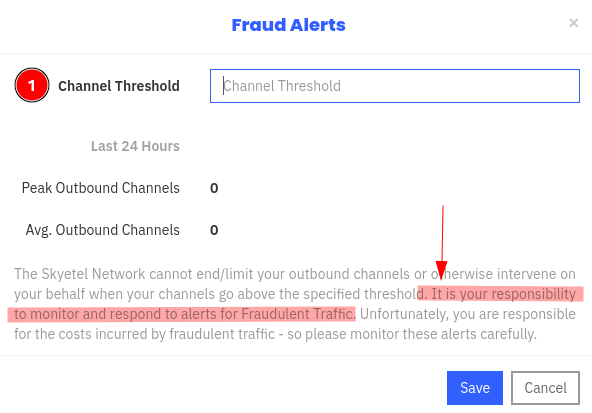
    Click on Set under Fraud Alerts

    1. Enter a value that is equal to the maximum number of simultaneous call you expect to have.
      • For example, if you used to have six lines from AT&T or Spectrum, then put 6 here to start.
    2. Read what is highlighted!! It is not going to be Skyetel's fault if you have a bad actor on your system. It is your responsibility to keep an eye on your system.
    3. Click Save
      a6475db7-449d-41b8-afdd-19e87ddcc06e-image.png

    Now click on the toggle to enable uptime alerts.

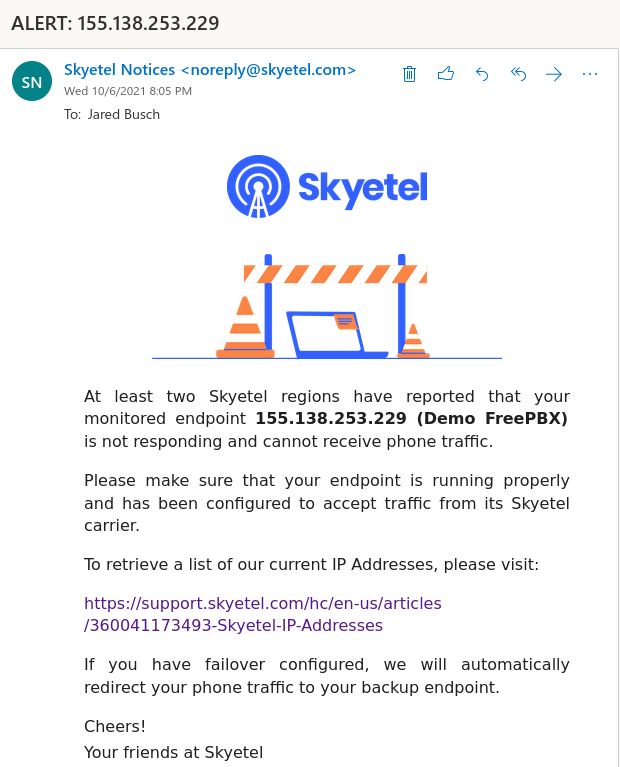
    • This is useful as Skyetel will then send you an email and text message (if you have a number in your profile) when two or more regions cannot reach your Endpoint.
      • It will use the Description from the Endpoint as set above. So make sure you populate that to something you understand.
        c189a0b3-24cd-41f3-8716-26ad8a79188a-image.png

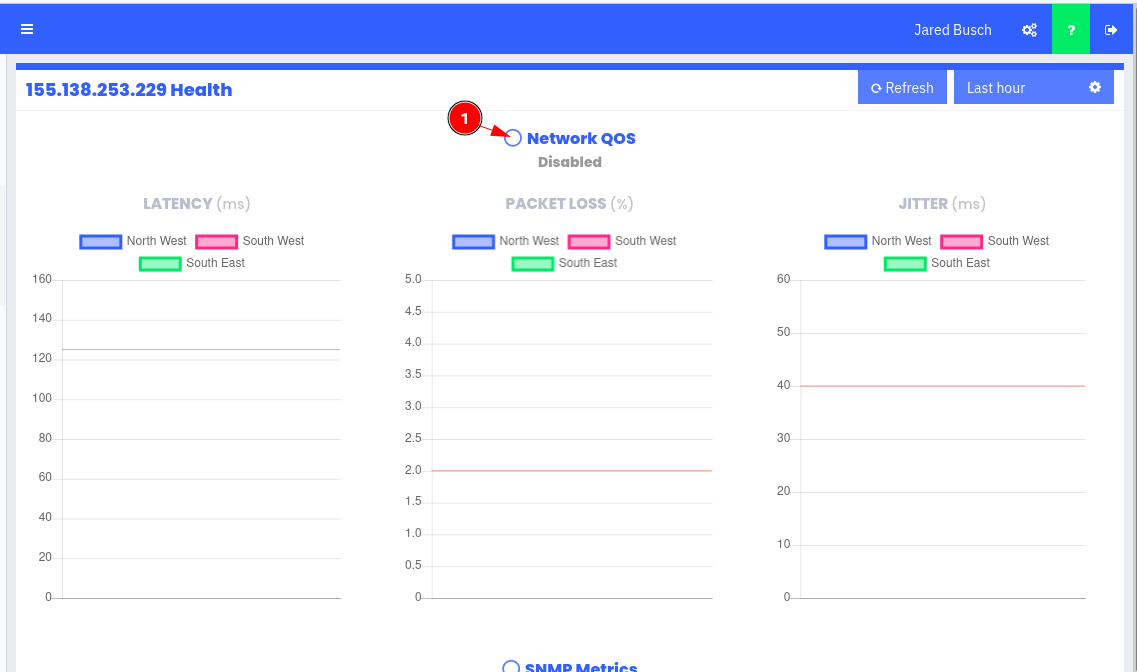
    Finally click on View more to see some advanced features.

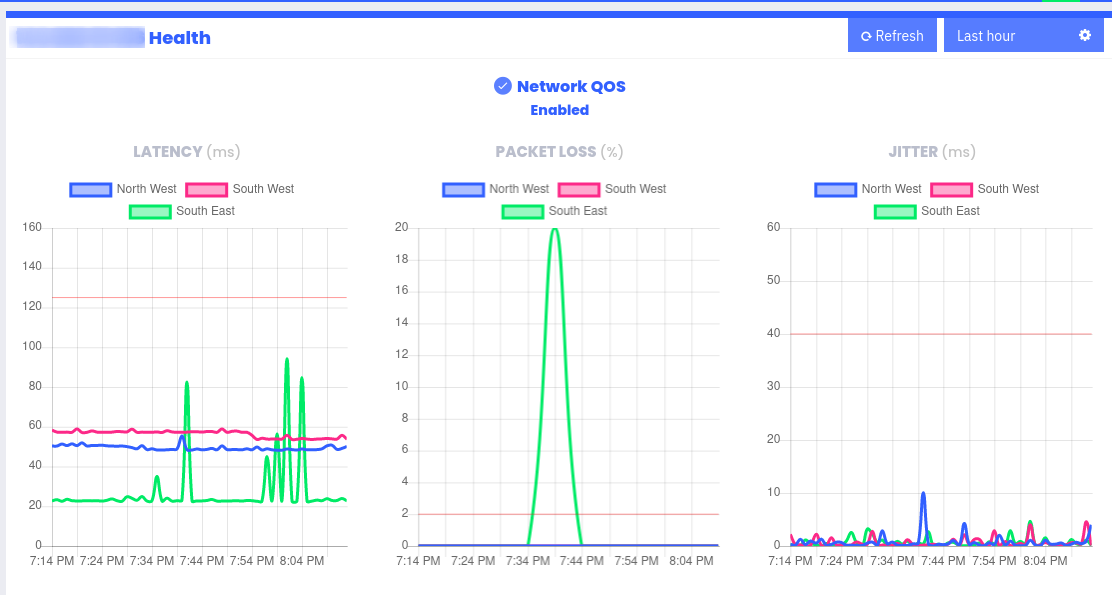
    • For now, the only thing to do is click in the circle in front of Network QOS. This will have Skyetel's system being to collect metrics from the "Hello, are you alive?" packets it sends to your Endpoint.
    • There is a second section on this page for SNMP Metrics, but that is an advanced topic that will have its own guide.
      ca74fe2f-cb95-4c9e-81f9-3a78144779b5-image.png

    Once it has been enabled and your PBX has been on line for a while, you will begin to see very useful data on this page. Here is a sample from a different Endpoint.

    74441ed9-f58a-4d14-99eb-a839a9483f66-image.png

    posted in FreePBX Guides
  • Resetting an lost admin password on Ubuntu/Linux Mint

    If your IT department is doing things right, then the user account that you log in to a computer with will not have administrative access.

    In the Linux ecosystem this is called sudo access.

    Normally an accout is made with sudo rights that is only used as needed.

    If the password for this account is lost, then there is no longer a way to administer the computer.
    In the Windows world, you shutdown the system and then boot to a specially crafted USB boot disk that you can read the Windows information and then reset the admin password.

    For Linux, it is easier. You simply need to reboot and interrupt the normal grub boot sequence to get into single user mode.

    1. Reboot the system.
      • As soon as it powers back on begin tapping the ESC key.
        Technically, we are only wanting to stop grub from automatically booting. but with modern SSD or NVMe drives, this can go by so fast you never knew it was available to interrupt.
    2. The first grub entry should be highlighted by default and is normally the one you want. Press e to edit that entry.
    3. Find the line beginning with linux
    4. Go to the end of the line and add init=/bin/bash
    5. Press F10 to boot to this modified file without permanently saving it.
    6. The system will boot to a command prompt similar to root@(none):/#
    7. Enter mount -o remount,rw / and press Enter.
    8. Now you can reset the admin account password with the passwd command: passwd YOURADMINNAME.
    9. Enter the new password, then again to confirm it.
    10. Type exit and then use the power button to reboot the computer.
    posted in Guides & Walkthroughs
  • Creating an ed25519 SSH key in Windows 10

    There are many reasons that you may need an SSH key setup on your system. Some of the most common reasons are connecting to git repository and connecting to a Linux server.

    This used to be a painful process, as Microsoft did not include OpenSSH in the operating system. Thankfully they rectified that over a year ago.

    As long as you are running an up to date version of Windows 10, you will have no problems following along.

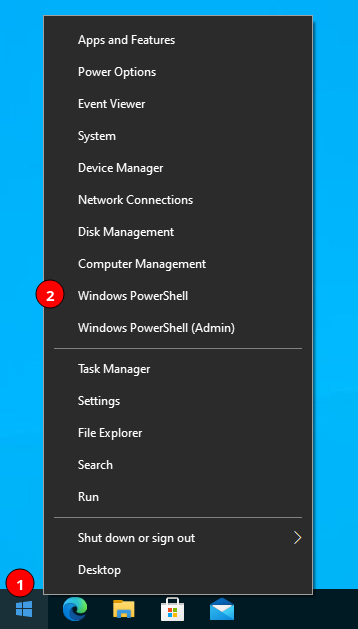
    1. Right click on the start button and choose Windows PowerShell

      • If your system says Command Prompt you are either not up to date, or you intentionally changed it back.
        35e530ba-dcfe-4ea4-a1d6-4471af5a3e2c-image.png
    2. In the powershell windows, run the ssh-keygen command as follows:

      • The -t ed25519 tell it which algorithm to use.
      • The -C "Work Computer" is a comment that makes it easy to know what a key was created on. Update appropriately.
    ssh-keygen -t ed25519 -C "Work Computer"
    
    1. It will prompt where to save the file. You will almost always want to use the default. Just press enter to accept the default.
      0ae4e9cb-4b2d-4006-9c1f-266054bd47c7-image.png
    2. It will ask for a passphrase. Generally, I do not set a passphrase on my SSH keys, but there are valid reasons to do so depending on your environment. Press enter again for no passphrase.
      66075dcb-5ca2-4b61-ad09-35ce878d7b97-image.png
    3. It will ask you to confirm the passphrase, even if you left it blank. Press enter again.
      2ce50e56-baa5-4ef4-b7a0-72be8771b6c3-image.png
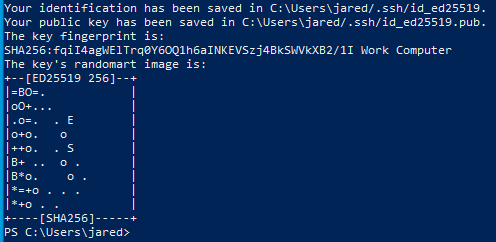
    4. It will then create your key and spit out some information about the key. Congratulations, you now have an SSH keypair available for use.
      300cdae7-1057-4883-8f73-19192a50922f-image.png

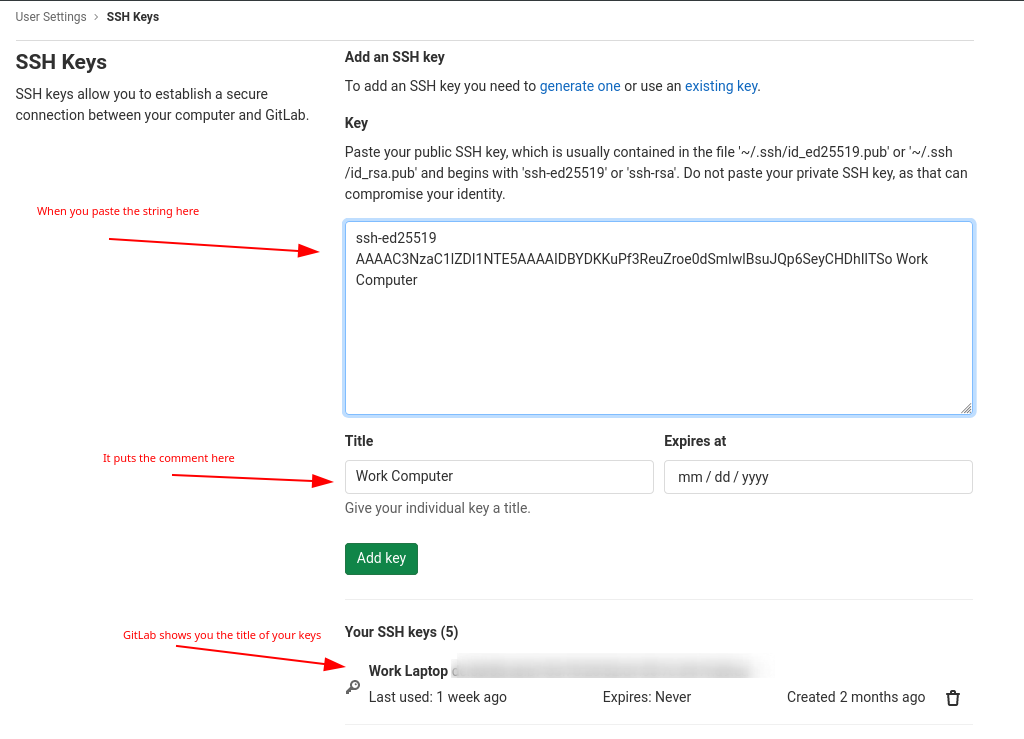
    This is why I recommend the -C command in the key generation. It puts whatever was in the comment out at the end of the public key string.
    d08f80c2-8a5a-41fb-a2f4-7a939956b237-image.png

    This useful when you add the key to things like GitLab. It will automatically title the key with that comment.
    db945d19-419f-4148-ae2b-54d93fbec0d3-image.png

    posted in Guides & Walkthroughs